
PUMPA - SMART LEARNING
எங்கள் ஆசிரியர்களுடன் 1-ஆன்-1 ஆலோசனை நேரத்தைப் பெறுங்கள். டாப்பர் ஆவதற்கு நாங்கள் பயிற்சி அளிப்போம்
Book Free DemoYou can make your own anemometer.
Collect the following items:
4 small paper cups (used ice cream cups), 2 strips of cardboard (20\ cm long and 2\ cm wide), gum, stapler, a sketch pen and a sharpened pencil with eraser at one end.
- Take a scale.
- Draw crosses on the cardboard strips as shown in the below figure. This will give you the centres of the strips.
- Fix the strips at the centre, putting one over the other so that they make a plus (+) sign.
- Now fix the cups at the ends of the strips.
- Colour the outer surface of one cup with a marker or a sketch pen.
- All the 4 cups should face in the same direction.
- Push a pin through the centre of the strips and attach the strips and the cups to the eraser of the pencil.
- Check that the strips rotate freely when you blow on the cups.
- Your anemometer is ready.
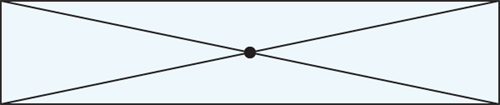
Finding centre of the strips
Counting the number of rotations per minute will give you an estimate of the speed of the wind. To observe the changes in the wind speed, use it at different places and different times of the day.
If you do not have a pencil with attached eraser you can use the tip of a ball pen. The only condition is that the strips should rotate freely.
Remember that this anemometer will indicate only . It will not give you the .
 Register for free to see more content