PDF chapter test TRY NOW
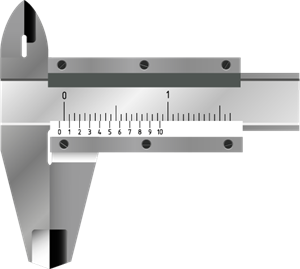
The initial step in using the Vernier caliper is to determine its least count, range and zero error.
Least Count:
Least Count of the Vernier caliper is,
The main scale division will be in cm (centimetre), further divided into mm (millimetre). The value of the smallest main scale division is 1 mm. In the Vernier scale, there will be 10 divisions.
So,
Zero Error:
Unscrew the slider and transfer it to the left, such that both the jaws touch each other. Examine whether the zero marking of the main scale matches with the zero of the Vernier scale. If they coincide, then there is no zero error.
If they do not coincide with each other, the Vernier is said to have zero error. Zero error may be positive or negative.
- If the zero of a Vernier is moved to the right of the main scale, it is called a positive error.
- On the other hand, if the zero of the Vernier is shifted to the left of zero of the main scale, then the error is negative.
Positive zero error:

Positive zero error
The above figure shows the positive zero error. The figure shows zero of the Vernier scale is moved to the right side of the zero of the main scale. In this case, the reading will be more than the actual reading. Hence, we should correct this error. To correct this error, find out which Vernier division coincides with any of the main scale divisions. Here, the fifth Vernier division is coinciding with the main scale division.
So, .
And the zero correction is negative. Hence, zero correction is –0.05 cm.
Negative zero error:

Negative zero error
The above figure shows the negative zero error. You can observe that the zero of the Vernier scale is moved to the left side of the zero of the main scale. So, the observed reading will be less than the actual reading. To rectify this error, we should first determine which Vernier division coincides with any of the main scale divisions, as we noticed in the previous case.
In this case, you can see that the sixth line is coinciding. To find the negative error, we can count backward (from 10). Here, the fourth line is coinciding.
Therefore,
And zero correction is positive. Hence, zero correction is +0.06 cm.
The below table represents how the length and diameter of the objects are measured using Vernier caliper.
Observations | Main scale reading MSR (cm) | No of Vernier divisions coinciding with the main scale divisions (n) | Fraction to be added x = n × LC (cm) | Observed diameter Y = MSR + x (cm) | Corrected diameter D = Y ± ZC (cm) |
1 | |||||
2 |
Uses of Vernier caliper:
We can use the Vernier caliper to find different dimensions of any familiar object. For example,
- We can calculate volume if we can measure the object's length, width, and height.
- We could measure the inner diameter (using appropriate jaws) and depth (using the depth probe) of a beaker. Then, we can calculate its inner volume.
